Home » Drywall Services
Category Archives: Drywall Services
The Basics of Drywall Repair
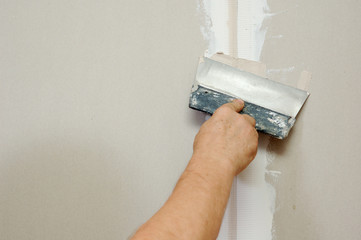
Drywall Repair is a simple and affordable DIY project for homeowners. Nail pops and other minor holes are easy to fix with patience and the right materials. To fix drywall holes, apply a thin coat of joint compound to the surface. Smooth the compound with your drywall knife and let it dry.
If you need to become more familiar with drywall, it is recommended to contact a professional to assist you in the repair process. Drywall Repair Las Vegas can provide the necessary tools and help you avoid common mistakes. They can also recommend the best sanding technique for your project.
Drywall tape is one of those inescapable realities of home remodeling that tends to get lumped into any wall work project. Without drywall tape, you can’t embed joint compound (or mud) into the seams of two adjacent pieces of drywall and create a smooth finish on your walls. The tape is designed to cover and hold the joints and add strength to them. There are two types of drywall tape, paper and mesh, each with its own advantages and applications.
Before you start taping your drywall repair, you need to cut a clean hole for the patch, then screw a support board into place on either side of the damaged area and cover the entire surface with a sleeve of drywall tape. This extra step may seem counterintuitive, but it is essential for creating a strong and smooth surface in the end.
When you are ready to begin taping, choose the type of drywall tape that best suits your needs and project. For most projects, paper tape will be sufficient. This type of tape has a light, pre-creased seam down the center and comes in rolls 2 in. wide and 250 or 500 ft. long. It is also designed to fold easily for use in inside corners.
The other type of drywall tape is mesh tape, which is made of woven fiberglass. This type of tape is better suited for use in areas that will experience stress, such as corners near doors and windows. It is also more durable and moisture resistant than paper tape.
Regardless of which kind of tape you choose, make sure you install it correctly. Getting it right can mean the difference between a perfectly smooth surface and a mess that looks like a painted waffle. There are some products on the market that claim to eliminate the need for a bedding coat of drywall compound, but these self-adhesive tapes have their drawbacks. They often need special care to apply properly and are not as durable as the traditional paper and mesh drywall tapes.
When you are ready to apply the first coat of drywall compound, thin it with water so that it adheres to the tape and is easy to smooth out with your drywall knife. Smooth the compound over the tape and let it dry overnight. Once the compound is dry, sand it with a sanding block or power sander to smooth it down and make it nice and level.
Joint Compound
When it comes to repairing walls, there are two types of compound: spackle and joint compound. While both are used to cover up blemishes, each has its own set of benefits and drawbacks. Joint compound (also known as drywall mud) is a great choice for the initial installation of a new wall, as well as conducting minor repairs. It can conceal joint tape, drywall screws and more. It also works great when finishing gypsum panels, corner bead and skim coating. It can be purchased in both premixed and powder forms.
Spackle, on the other hand, is a better option for covering up nail holes and other small blemishes on existing walls. It is easy to use and dry very quickly, but it can be a bit messy. It also requires sanding, which can lead to dust all over the floor. It is not as versatile as drywall compound, and it may not be the best choice when fixing larger issues in a home.
Both products have their own safety risks, but they can be less hazardous than asbestos when used correctly. However, asbestos is still present in many older homes and should be avoided. It is important to follow the directions for each type of product to reduce your risk of injury or illness.
In addition to drywall, professionals can also fix plaster and other surfaces. They can also provide a wide variety of other services for your home, such as painting, flooring and remodeling. They can even install solar panels and other energy efficient items. To get a free quote, enter your zip code below. You will be matched with top-rated pros in your area. We only work with licensed, bonded and insured companies. You can trust that you will receive the highest quality service at a fair price.
Sanding
When the drywall patch is dry, sand it lightly with a hand sander to smooth and prepare the surface for priming and painting. Use a fine-grit sandpaper and apply light pressure to avoid gouging or damaging the paper. Be sure to sand the edges of the patch as well, feathering them into the surrounding wall.
The sanding process will create a lot of dust, so it’s a good idea to wear a face mask or respirator to protect yourself. Alternatively, you can use an electric sander with built-in suction to minimize the amount of dust produced. It also helps to have a broom handy to sweep up the debris as you work.
Depending on the size of the hole, you may be able to cover it with a single application of spackle or joint compound. However, larger holes require a second or third coat to blend and smooth the taped area with the rest of the wall. When applying the second or third coat, be sure to sand with very light pressure and feather the edge of the patch into the surrounding wall.
For very large holes, it’s a better idea to use a drywall kit that includes a larger piece of drywall. You can buy these kits at most home improvement stores or online. The kit will contain a piece of drywall that is slightly larger than the hole, furring strips, joint compound and drywall screws. For best results, the drywall patch should be installed with one screw above and below the hole and two on the sides to help hold it in place and prevent cracking during the installation process.
Before sanding the repaired area, wipe down the entire wall with a damp cloth to remove any dust or dirt that has settled on the drywall. This will ensure that the paint adheres properly when you’re ready to finish the project.
Once you’ve sanded the entire wall, shine a light along the seams to reveal any gouges, grooves or ridges that need filling and resanding. If necessary, apply a third or fourth coat of joint compound and sand again until it’s smooth and ready for primer and paint.
Paint
Painting over drywall repairs can be tricky, even when the patch and the surrounding wall are exactly the same color. That’s because the way light reflects off the surface of the patch can make it stand out from the surrounding paint, especially when the reflected light is strong. That’s why it’s important to find a drywall repair and paint contractor that can match the exact color of your walls, or at least one that will come close enough to not be obvious.
The first step in preparing a room to be painted is to wash the walls. A simple bucket of warm water with a bit of mild household detergent can help remove any dirt, dust or other contamination. For areas that haven’t been painted in a while, you might want to add a bit of ammonia to the water for extra cleaning power.
After the walls are clean, they should be sanded before they’re ready for primer and paint. It’s a good idea to wear a respirator when sanding, and be sure to use a vacuum attachment on your sander to suck up the drywall dust. It’s also a good idea to put a drop cloth on the floor where you’re sanding.
Nail pops are another common drywall problem that can be easy to repair but annoying when they happen repeatedly. The nails were probably driven into the drywall when the house was built, and they’re now popping out from the wood framing that’s attached to the drywall. A nail pop can be fixed by either driving the nail back down using a nail set, or by filling in the hole with a joint compound, swiping it down first and then across it, allowing it to dry, sanding again, and finally priming and painting.
A popped nail is often the result of improper installation, but it can also happen when there’s movement in the house over time that can cause the drywall to shift or buckle. It’s usually fairly easy to fix by filling the hole with a joint compound, letting it dry and then sanding again, and finally priming then painting.